Integrate Authenticate 6wind using Radius.
Server Radius
run the apt update and upgrade command below to update and refresh the package index on your system.
sudo su
apt update && apt upgrade -y
Install Linux, Apache, MySQL, PHP (LAMP) stack on server. First, install Apach and once the installation is finished, you’ll need to adjust your firewall settings to allow HTTP traffic. Since this is a fresh Apache installation and you still don’t have a TLS/SSL certificate configured to allow for HTTPS traffic on your server.
apt install apache2
sudo ufw allow in "Apache"
Now that you have a web server up and running, you need to install the database system to be able to store and manage data for your site. MySQL is a popular database management system used within PHP environments. These commands will install MariaDB, but will not prompt you to set a password or make any other configuration changes.
sudo apt update
sudo apt install mariadb-server
For new MariaDB installations, the next step is to run the included security script. This script changes some of the less secure default options for things like remote root logins and sample users.
Run the security script:
sudo mysql_secure_installationThis will take you through a series of prompts where you can make some changes to your MariaDB installation’s security options. The first prompt will ask you to enter the current database root password. Since you have not set one up yet, press ENTER to indicate “none”.
apt install php libapache2-mod-php php-mysql php-pear-DB
pear install DB
Once the installation is finished, you can run the following command to confirm your PHP version:
php -vThen,
run the following apt install command to install the following packages for the FreeRADIUS server on your Ubuntu system:
- The
freeradiuspackage is the main package of the FreeRADIUS server. - The
freeradius-mysqlpackage supports the FreeRADIUS to use MySQL/MariaDB as the database backend. - The
freeradius-utilspackage provides additional command-line tools for managing the FreeRADIUS server.
sudo apt install freeradius freeradius-mysql freeradius-utils -yAfter installing the FreeRADIUS package with the MySQL/MariaDB backend, you’ll create a new MariaDB database as the backend for FreeRADIUS. To create a MariaDB database:
Run the mysql command below to log in to the MariaDB shell using the user root.
sudo mysql -u root -pNext, run each following MariaDB query to create a new database and user for the FreeRADIUS. Be sure to change the detailed database name, user, and password, as you like.
# Create a new database named freeradiusdb
CREATE DATABASE freeradiusdb;

# Create a user named freeradiususer and allow to access freeradiusdb
GRANT ALL ON freeradiusdb.* TO freeradiususer@localhost IDENTIFIED BY "RadiusDatabasePassword";

# Reload tables privileges
FLUSH PRIVILEGES;
then type exit to log out from the MariaDB shell.
You’ve just created the MariaDB database and user for the FreeRADIUS as the backend.
Run the systemctl commands below to stop and verify the freeradius service. Make sure the status is inactive before configuring the FreeRADIUS server. Here’s how to use Ubuntu systemctl to control systemd.
# Stop freeradius service
sudo systemctl stop freeradius

# Verify freeradius status
sudo systemctl status freeradius
Next, run the mysql command below to import the FreeRADIUS database schema to the database freeradiusdb. Be sure to input the correct MariaDB root password.
mysql -u root -p freeradiusdb < /etc/freeradius/3.0/mods-config/sql/main/mysql/schema.sqlRun the mysqlshow command below to verify the database schema of the freeradiusdb database.
mysqlshow freeradiusdb
Next, edit the configuration /etc/freeradius/3.0/mods-available/sql using your preferred editor and change the following inside the sql {...} section:
- Change the
dialectvalue tomysqlas the database. - Be sure to comment out the option
driver = "rlm_sql_null"by adding the#symbol at the beginning. - Uncomment the
driver = "rlm_sql_${dialect}"option to enable MySQL/MariaDB backend by removing#symbol in front.
sql {
			dialect = "mysql"

			#driver = "rlm_sql_null"
			driver = "rlm_sql_${dialect}"
Look for the mysql {...} section, and comment out all TLS options to disable TLS support for the MariaDB database backend, as shown below. In this tutorial, the FreeRADIUS server and MariaDB database are on the same server, so you do not need the MariaDB TLS support.
mysql {
                # If any of the files below are set, TLS encryption is enabled
                #tls {
                #       ca_file = "/etc/ssl/certs/my_ca.crt"
                #       ca_path = "/etc/ssl/certs/"
                #       certificate_file = "/etc/ssl/certs/private/client.crt"
                #       private_key_file = "/etc/ssl/certs/private/client.key"
                #       cipher = "DHE-RSA-AES256-SHA:AES128-SHA"

                #       tls_required = yes
                #       tls_check_cert = no
                #       tls_check_cert_cn = no
                #}

                # If yes, (or auto and libmysqlclient reports warnings are
                # available), will retrieve and log additional warnings from
                # the server if an error has occured. Defaults to 'auto'
                warnings = auto
        }
Uncomment the read_clients = yes option to allow FreeRADIUS clients to read from the nas table inside the FreeRADIUS database. Save all the changes you made and close the file.
        # Set to 'yes' to read radius clients from the database ('nas' table)
        # Clients will ONLY be read on server startup.
        read_clients = yes
Now, run each command below to enable the MySQL/MariaDB module for FreeRADIUS. And change the ownership of the configuration file /etc/freeradius/3.0/mods-enabled/sql to the user and group freerad.
# Activate MariaDB/MySQL module FreeRADIUS
sudo ln -s /etc/freeradius/3.0/mods-available/sql /etc/freeradius/3.0/mods-enabled/

# Change ownership to freerad
sudo chown -h freerad.freerad /etc/freeradius/3.0/mods-enabled/sql
Lastly, to allow traffic on port radius which use1812 and 1813 run the following commands to start and verify the freeradius service.
# Start freeradius service
sudo ufw allow 1812
sudo ufw allow 1813

# Start freeradius service
sudo systemctl start freeradius

# Verify freeradius status
sudo systemctl status freeradius
At this point, the new FreeRADIUS server is now running with the MariaDB database backend. If your configuration is correct, you’ll see the freeradius service is active (running). And at the bottom log messages, you’ll see the FreeRADIUS connecting to the MySQL/MariaDB server.
root@ubuntu:/home/ubuntu# systemctl status freeradius
● freeradius.service - FreeRADIUS multi-protocol policy server
     Loaded: loaded (/lib/systemd/system/freeradius.service; enabled; vendor preset: enabled)
     Active: active (running) since Wed 2024-01-03 10:58:49 WIB; 5 days ago
       Docs: man:radiusd(8)
             man:radiusd.conf(5)
             http://wiki.freeradius.org/
             http://networkradius.com/doc/
   Main PID: 273509 (freeradius)
     Status: "Processing requests"
      Tasks: 6 (limit: 4595)
     Memory: 79.2M
     CGroup: /system.slice/freeradius.service
             └─273509 /usr/sbin/freeradius -f

Jan 03 10:58:49 ubuntu freeradius[273495]: Configuration appears to be OK
Jan 03 10:58:49 ubuntu freeradius[273495]: rlm_sql (sql): Removing connection pool
Jan 03 10:58:49 ubuntu freeradius[273495]: rlm_sql (sql): Closing connection (0)
Jan 03 10:58:49 ubuntu freeradius[273509]: WARNING: MYSQL_OPT_RECONNECT is deprecated and will be removed in a future v>
Jan 03 10:58:49 ubuntu freeradius[273509]: WARNING: MYSQL_OPT_RECONNECT is deprecated and will be removed in a future v>
Jan 03 10:58:49 ubuntu freeradius[273509]: WARNING: MYSQL_OPT_RECONNECT is deprecated and will be removed in a future v>
Jan 03 10:58:49 ubuntu freeradius[273509]: WARNING: MYSQL_OPT_RECONNECT is deprecated and will be removed in a future v>
Jan 03 10:58:49 ubuntu freeradius[273509]: WARNING: MYSQL_OPT_RECONNECT is deprecated and will be removed in a future v>
Jan 03 10:58:49 ubuntu freeradius[273509]: WARNING: MYSQL_OPT_RECONNECT is deprecated and will be removed in a future v>
Jan 03 10:58:49 ubuntu systemd[1]: Started FreeRADIUS multi-protocol policy server.
You now have a FreeRADIUS server running with the MariaDB database as backend support. But wouldn’t it be nice to have a GUI that provides user management for the FreeRADIUS server? Why not install daloRADIUS? daloRADIUS is a PHP-based web application for managing the FreeRADIUS server.
To install daloRADIUS on your server:
Run each command below to change your current working directory to /var/www/html and download (wget) the daloRADIUS source code.
# Change working directory
cd /var/www/html/

# Download the daloRADIUS source code
wget https://github.com/lirantal/daloradius/archive/refs/tags/1.3.tar.gz
Next, run each command below to extract (tar -xf) the daloRADIUS source code (1.3.tar.gz) and rename the extracted directory to daloradius.
# Extract daloRADIUS source code
tar -xf 1.3.tar.gz

# Verify extracted directory
ls

# Rename directory to `daloradius`
mv daloradius-1.3 daloradius

# Verify changed directory name to daloradius
ls -l
After extraction, run the below commands to import the database schema for daloRADIUS to the freeradiusdb database and verify the list of tables on the FreeRADIUS database. Input your MariaDB root user password when prompted.
# import daloRADIUS database schema
mysql -u root -p freeradiusdb < /var/www/html/daloradius/contrib/db/fr2-mysql-daloradius-and-freeradius.sql

# verify database schema
mysqlshow freeradiusdb
Below, you can see a list of tables for FreeRADIUS and daloRADIUS from the freeradiusdb database.
root@ubuntu:/home/ubuntu# mysqlshow freeradiusdb
Database: freeradiusdb
+------------------------+
|         Tables         |
+------------------------+
| batch_history          |
| billing_history        |
| billing_merchant       |
| billing_paypal         |
| billing_plans          |
| billing_plans_profiles |
| billing_rates          |
| cui                    |
| dictionary             |
| hotspots               |
| invoice                |
| invoice_items          |
| invoice_status         |
| invoice_type           |
| nas                    |
| node                   |
| operators              |
| operators_acl          |
| operators_acl_files    |
| payment                |
| payment_type           |
| proxys                 |
| radacct                |
| radcheck               |
| radgroupcheck          |
| radgroupreply          |
| radhuntgroup           |
| radippool              |
| radpostauth            |
| radreply               |
| radusergroup           |
| realms                 |
| userbillinfo           |
| userinfo               |
| wimax                  |
+------------------------+
Now, run the cp command below. This command doesn’t have an output but copies the daloRADIUS configuration to /var/www/html/daloradius/library/daloradius.conf.php.
cp /var/www/html/daloradius/library/daloradius.conf.php.sample /var/www/html/daloradius/library/daloradius.conf.php
Edit the /var/www/html/daloradius/library/daloradius.conf.php configuration using your preferred editor to set up the database configuration for daloRADIUS.
Change the database name (freeradiusdb), the user (freeradiususer), and password (RadiusDatabasePassword) below with your details.
Save the changes and close the file.
include (dirname(__FILE__).'/version.php');

$configValues['FREERADIUS_VERSION'] = '2';
$configValues['CONFIG_DB_ENGINE'] = 'mysqli';
$configValues['CONFIG_DB_HOST'] = 'localhost';
$configValues['CONFIG_DB_PORT'] = '3306';
$configValues['CONFIG_DB_USER'] = 'freeradiususer';
$configValues['CONFIG_DB_PASS'] = 'RadiusDatabasePassword';
$configValues['CONFIG_DB_NAME'] = 'freeradiusdb';
Change the ownership (chown) of the /var/www/html/daloradius directory to www-data. Change the permission (chmod) of the file daloradius.conf.php to 0664 to secure the configuration file.
# Change ownership to www-data
sudo chown -R www-data:www-data /var/www/html/daloradius/

# Change permission to 0664
sudo chmod 0664 /var/www/html/daloradius/library/daloradius.conf.php
Then, run the systemctl command below to restart the freeradius service and apply new changes, but without any output.
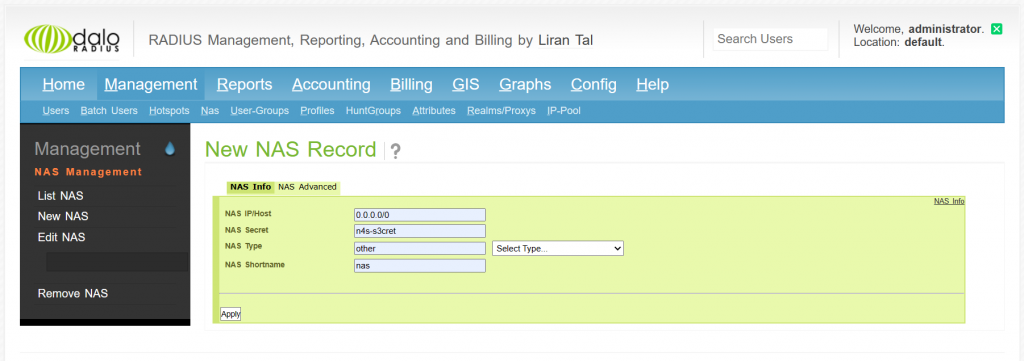
sudo systemctl restart freeradiusTo verify daloradius, open your favorite browser and type your server IP address followed by the path /daloradius (i.e., http://ip-address/daloradius). Doing so redirects your browser to the daloRADIUS login page. Then create NAS (Network Access Server) 0.0.0.0/0 to access any ip address and mandatory to specify NAS secret for authenticate and type NAS other.
6wind BNG
First, we need to reach the daloRadius IP address from 6wind BNG. If it can reach, for integrate between daloRadius 6wind we need to define ip address of daloRadius (in this case use 10.77.7.7.164) and secret of NAS on Daloradius that we configured before. Optionally we can define source local ip that can reach IP address of daloRadius (in this case use 10.77.7.7.160).
BNG-6wind> edit running
BNG-6wind running config# system aaa
BNG-6wind running aaa# radius 1
BNG-6wind running radius 1# address 10.77.7.164
BNG-6wind running radius 1# secret n4s-s3cret
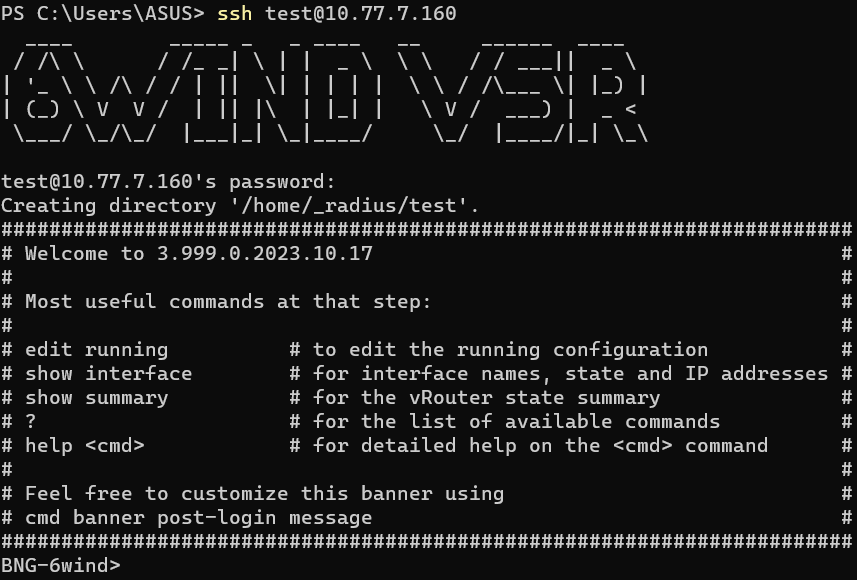
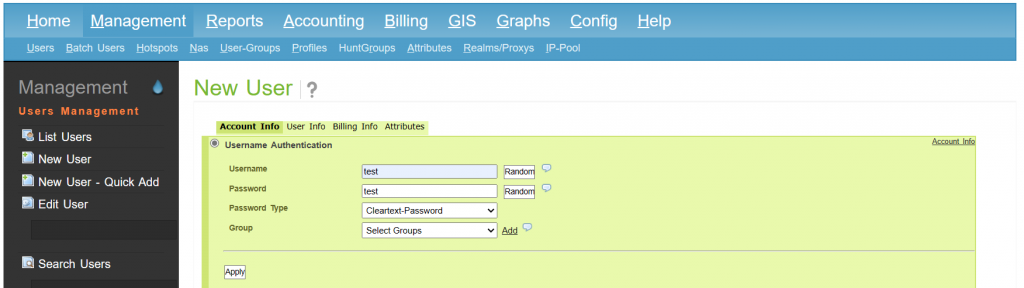
BNG-6wind running radius 1# source 10.77.7.160To verify the integration between radius and 6wind, we can try add user test with password test in this window and click apply.
Next, we can try to login using new user test in 6wind. And 6wind router will auto-generate new user directory on its local disk on this directory /home/_radius/test.